博客

  • How to Clean Stickers Without Scratching, Peeling, or Fading

    How to Clean Stickers Without Scratching, Peeling, or Fading

    Dust, fingerprints, and oily marks can make a sticker look old before the sticker itself has reached the end of its service life. Safe cleaning can preserve the appearance, but a rough cloth, stiff brush, strong solvent, or high-pressure spray may scratch the surface, dull the laminate, fade the ink, or lift the edges.

    The method below suits many vinyl stickers, labels, and laminated graphics applied to smooth surfaces. Materials vary, so follow the care instructions from the supplier whenever they are available.

    Check three things before cleaning

    • Sticker material: Paper stickers may deform or stain when wet, so do not automatically use the same method as for vinyl.
    • Surface finish: Gloss, matte, laminate, and specialty coatings tolerate friction and chemicals differently.
    • Installation age: New graphics need time for the adhesive to stabilize according to the product instructions. Do not soak, scrape, or pressure-wash a newly applied sticker.

    How to clean a sticker safely

    Step 1: Remove loose dust

    Use a clean soft brush, air blower, or soft dry cloth to lift away loose particles. Do not start by rubbing hard, because grit trapped under the cloth can create fine scratches.

    Step 2: Prepare water and a soft microfiber cloth

    Start with clean water. For light grease, use a small amount of mild neutral cleaner diluted in water. Spray onto the cloth rather than flooding the sticker or its edges.

    Step 3: Wipe gently in one direction

    Use a damp, not dripping, microfiber cloth and wipe from one side to the other with light pressure. Do not use a stiff brush, scouring pad, rough paper towel, or gritty cleaning paste. For stubborn marks, hold the damp cloth over the area briefly to soften the residue, then wipe again.

    Step 4: Blot the moisture dry

    Use a second clean soft cloth to blot the surface, especially around edges and seams. Do not lift an edge to inspect it, and never use a sharp object to pick at residue.

    Cleaning habits that can damage stickers

    Avoid Possible result Safer alternative
    Hard brush or rough sponge Surface scratches or worn laminate Soft microfiber cloth
    Strong solvent, bleach, or aggressive adhesive remover Fading, dullness, or softened adhesive Water first, then diluted mild neutral cleaner if suitable
    Close-range high-pressure spray at the edge Water intrusion, edge lifting, or peeling Lower pressure, greater distance, and no direct spray at edges
    Cleaning in direct sun or on a hot surface Overheating and cleaner drying too quickly Clean in shade after the surface cools
    Scraping with a blade or fingernail Permanent scratches or cuts in the face material Soften residue with a damp cloth, then wipe gently

    How to reduce fading and peeling

    Choose the right material: For long-term outdoor use, confirm the outdoor rating of the face stock, ink, and laminate. “Water resistant” alone does not describe the full service life.

    Limit UV, heat, and prolonged moisture: Sunlight, heat sources, and constant dampness can accelerate aging in some inks and adhesives. Window, vehicle, and outdoor graphics should be specified for their expected exposure.

    Keep the application surface clean: Before installation, remove dust, grease, wax, and residues. Dirt and moisture at the edge make later lifting more likely.

    Test unfamiliar cleaners: Apply any new cleaner to a small hidden area first. Let it dry, then check the color, gloss, and adhesive before cleaning the full sticker.

    What if the sticker is already faded or lifting?

    Fading is usually caused by UV exposure, heat, chemicals, or material aging. Cleaning cannot bring lost color back. If an edge has just started to lift, stop rubbing it and ask the supplier whether it can be safely re-pressed. Cracking, persistent peeling, or damaged substrate usually calls for a replacement and a review of the surface and material choice.

    Frequently asked questions

    Can I use rubbing alcohol to clean a sticker?

    Do not assume it is safe. Alcohol affects different inks, laminates, and adhesives in different ways and may cause dullness, fading, or edge release. Unless the supplier approves it, start with water and a mild neutral cleaner.

    Can stickers go through a car wash?

    It depends on the sticker material, laminate, installation age, and wash pressure. High-pressure water, brushes, and hot wax can damage graphics, especially at edges and seams. Follow the supplier’s vehicle-graphic care instructions.

    Why does the color look lighter after cleaning?

    There may be a water film, cleaner residue, or new glare on the surface, or the ink or laminate may have been damaged. Rinse with clean water, let it dry fully, and inspect it under even light. If it remains lighter, further cleaning will not restore the color.

    Remember: remove dust first, wipe gently with water and a soft cloth, blot the edges dry, and test any unfamiliar cleaner before full use.
  • Pegatinas de medio corte y troqueladas: ¿qué diferencia hay y cuál elegir?

    Pegatinas de medio corte y troqueladas: ¿qué diferencia hay y cuál elegir?

    Al pedir pegatinas personalizadas, muchas personas se fijan primero en el tamaño, el material y el color de impresión, pero olvidan el tipo de corte. Las pegatinas de medio corte y las troqueladas pueden tener contornos personalizados, aunque atraviesan capas diferentes. Por eso cambian la forma de despegar, embalar, repartir y aplicar el producto.

    ¿Qué es una pegatina de medio corte?

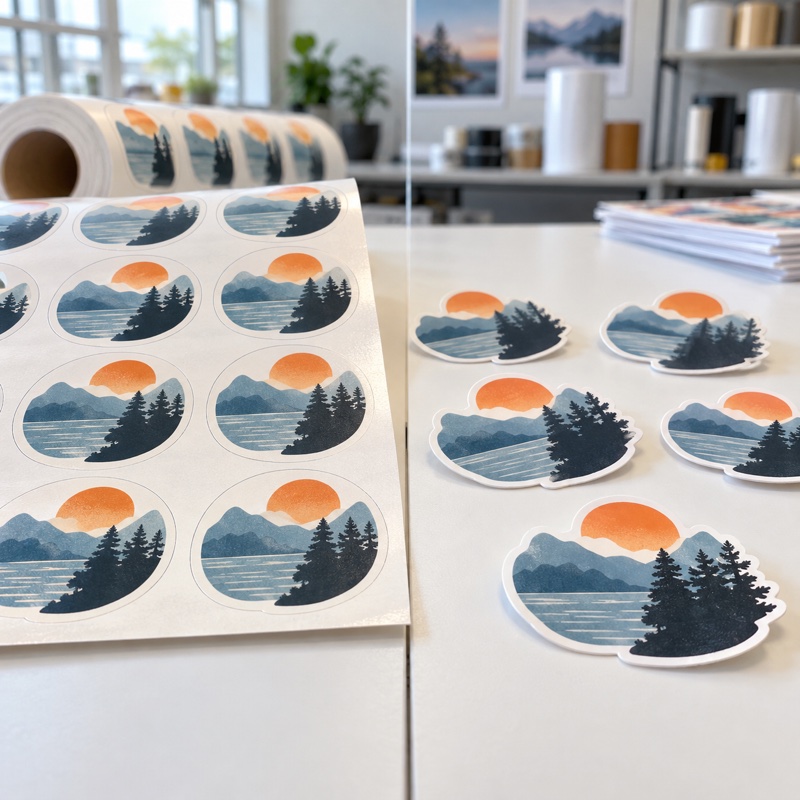
    El medio corte atraviesa el material frontal de la pegatina, pero no corta el papel soporte o liner. Las piezas permanecen en una hoja o bobina continua y se despegan del soporte justo antes de aplicarlas.

    • Aspecto: normalmente queda un margen de soporte alrededor de cada diseño y se pueden colocar varias piezas en una misma hoja.
    • Manipulación: resulta cómodo para packs, envíos, muestras, inserciones de embalaje y uso individual.
    • Distribución: varios diseños pueden compartir una hoja, lo que facilita el almacenamiento y la organización.
    • Usos habituales: merchandising, promociones, muestras y packaging para ecommerce.

    ¿Qué es una pegatina troquelada?

    El troquelado sigue el contorno exterior del diseño y corta tanto la pegatina como el soporte. Cada unidad queda separada y lista para recoger y aplicar directamente.

    • Aspecto: la unidad normalmente no conserva un margen rectangular de soporte, por lo que su silueta destaca más.
    • Manipulación: es útil para expositores, entregas en eventos y aplicaciones rápidas.
    • Embalaje: cada pegatina puede embolsarse, colocarse en una caja o entregarse como promoción.
    • Usos habituales: logotipos, gráficos para vehículos o escaparates, ferias y pegatinas coleccionables.

    Diferencias clave entre medio corte y troquelado

    Comparación Medio corte Troquelado
    Profundidad Corta la pegatina, no el soporte Corta la pegatina y el soporte
    Formato final Permanece en una hoja o bobina Cada unidad queda separada
    Uso Despegar del soporte y aplicar Tomar la unidad terminada y aplicar
    Ideal para Packs, envíos, packaging y distribución en cantidad Venta, exposición, eventos y siluetas llamativas
    Impresión visual Ordenada y fácil de guardar en conjunto Independiente, visible y lista para entregar

    ¿Cuál deberías elegir?

    Elige medio corte para hojas y diseños combinados

    El medio corte es práctico cuando varios diseños deben permanecer juntos. El soporte ayuda a mantenerlos limpios y ordenados, pero cada pegatina se puede despegar por su propia línea de corte.

    Elige troquelado para mostrar y repartir unidades individuales

    El troquelado funciona mejor cuando cada pegatina debe parecer un producto terminado. Elimina el sobrante rectangular y agiliza la entrega en tiendas, eventos o puntos de instalación.

    Evalúa la durabilidad por separado

    El tipo de corte no hace que una pegatina sea impermeable, resistente al sol o resistente al desgaste. La durabilidad depende del material frontal, la tinta, el laminado, el adhesivo y el entorno. Para exterior, confirma el material, el acabado y la vida útil prevista.

    Cuatro detalles que debes confirmar antes de pedir

    1. Confirma si necesitas medio corte o corte completo del soporte, y entrega el archivo de contorno o línea de corte correcto.
    2. Confirma si necesitas tinta blanca, zonas transparentes, laminado, esquinas redondeadas u otro acabado.
    3. Describe la superficie y el entorno: interior, exterior, vidrio, packaging, vehículos o superficies texturizadas.
    4. Para líneas finas, puntas agudas, detalles aislados o textos pequeños, solicita una revisión de producción o una prueba.

    Preguntas frecuentes

    ¿Qué es más barato, el medio corte o el troquelado?

    El precio no depende únicamente del corte. También influyen el tamaño, la cantidad, el material, el laminado, la complejidad del diseño, el embalaje y el envío. Pide el presupuesto con todas las especificaciones.

    ¿Una pegatina troquelada puede tener una forma compleja?

    Sí, pero el contorno necesita suficiente margen para poder despegarla y aplicarla. Las puntas muy finas, las piezas diminutas o los textos pequeños pueden dificultar la producción y la manipulación.

    ¿Las pegatinas de medio corte se pueden usar de una en una?

    Sí. Cada diseño se corta por separado en el material frontal, aunque el soporte permanezca unido. Solo hay que despegar cada pieza siguiendo su línea de corte.

    En resumen: elige medio corte para hojas organizadas y distribución agrupada; elige troquelado para unidades independientes, siluetas más visibles y uso rápido.

  • Kiss-Cut vs. Die-Cut Stickers: What’s the Difference and Which Should You Choose?

    Kiss-Cut vs. Die-Cut Stickers: What’s the Difference and Which Should You Choose?

    When ordering custom stickers, people often focus on size, material, and print color but overlook the cutting method. Kiss-cut and die-cut stickers can both have custom outlines, yet they cut through different layers. That difference affects how the stickers are peeled, packed, distributed, and applied.

    What is a kiss-cut sticker?

    A kiss cut goes through the sticker face material without cutting through the backing liner. The stickers remain on one continuous sheet or roll, so the user peels each piece from the liner before applying it.

    • Appearance: A border of backing usually remains around each sticker, and several designs can be arranged on one sheet.
    • Handling: Convenient for sticker packs, mailers, packaging inserts, samples, and one-by-one peeling.
    • Layout: Different designs can share one sheet, which makes storage and organization simple.
    • Common uses: Brand merchandise, promotional giveaways, sample sets, and ecommerce packaging.

    What is a die-cut sticker?

    A die cut follows the outside contour of the design and cuts through both the sticker and the backing liner. Each sticker becomes an individual finished piece that can be picked up and applied directly.

    • Appearance: The individual sticker usually has no rectangular excess liner, so its silhouette stands out.
    • Handling: Useful for retail display, event handouts, and quick application.
    • Packaging: Individual stickers can be bagged, boxed, or handed out as small promotional items.
    • Common uses: Logos, vehicle graphics, window graphics, trade-show handouts, and collectible stickers.

    The key differences between kiss cut and die cut

    Comparison Kiss cut Die cut
    Cut depth Cuts the sticker but not the liner Cuts through the sticker and liner
    Finished form Stays on a sheet or roll Each sticker is a separate piece
    How it is used Peel from the liner, then apply Pick up the finished sticker and apply
    Best for Sticker packs, shipping, packaging inserts, and bulk distribution Retail, display, events, and bold custom silhouettes
    Visual impression Organized and easy to store as a group Standalone, prominent, and ready to hand out

    Which one should you choose?

    Choose kiss cut for sheets and mixed designs

    Kiss cutting is a practical choice when several designs need to stay together. The backing keeps the pieces clean and organized, while each sticker can still be peeled along its own cut line.

    Choose die cut for individual display and fast distribution

    Die cutting is a better fit when every sticker should look like a finished standalone item. It removes the extra sheet around the design and saves time at retail counters, events, or installation sites.

    Think about durability separately

    The cutting method does not by itself make a sticker waterproof, fade resistant, or abrasion resistant. Durability depends on the face stock, ink, laminate, adhesive, and environment. For outdoor work, confirm the material grade, surface finish, and expected service life.

    Four details to confirm before ordering

    1. Confirm whether the order is kiss cut or cut through the liner, and provide the correct contour or cut-line file.
    2. Confirm whether you need white ink, transparent areas, laminate, rounded corners, or another finish.
    3. Describe the application surface and environment: indoor, outdoor, glass, packaging, vehicles, or textured surfaces.
    4. For fine lines, sharp points, isolated details, or small type, request a production check or proof before the full run.

    Frequently asked questions

    Which is cheaper, kiss cut or die cut?

    Cut style alone does not determine the price. Size, quantity, material, laminate, artwork complexity, packaging, and shipping all matter. Kiss cutting can be efficient for multiple designs on one sheet, while die cutting suits individual pieces; request a quote using the complete specification.

    Can a die-cut sticker have a complex shape?

    Yes, but the outline needs enough safety margin for peeling and application. Very thin points, tiny isolated parts, or small text may be difficult to produce or handle, so have the cut line reviewed before production.

    Can kiss-cut stickers still be used one at a time?

    Yes. Each sticker is cut separately through the face material, even though the backing remains connected. Peel each piece along its cut line.

    In short: choose kiss cut for organized sheets and grouped distribution; choose die cut for standalone pieces, stronger silhouettes, and quick use.